
This article will cover how you can automatically add a deadline to a ticket using a Zendesk trigger. Simply put, the requirement for creating a deadline is that you set a value for each of the ticket fields installed by the app which is date, time, and timezone.
Using Zendesk triggers, you're already able to set a date field on a ticket X number of days in the future, however, one of the limitations of Zendesk triggers is that you're not able to update custom text fields. Since the deadline time and timezone are text fields, that means this is not possible to automatically set the time of the deadline right? Well no. It's not as easy as it could be (it's a little advanced), but it is still possible.
|
|
If automatic deadlines and/or SLA's are important to your workflow, we highly recommend trying out our new timers app which greatly simplifies this process before getting stuck into this article. Learn about how timers work. |
This article contains the following sections:
- Step 1: Create a webhook
- Step 2: Create a trigger
- Retrieve the deadline field IDs
- Using the correct values
- Final JSON body
STEP 1: Create a webhook
Please refer to our article on how to create a webhook to make any change to a ticket and complete steps 1-3 only. This webhook only needs to be created once and can be used in a variety of ways.
In this case, we will be using the webhook to update custom ticket fields used by the app in order to automatically set a deadline on the ticket.
STEP 2: Create a trigger
Once again, you can refer to the article on how to create a webhook to make any change to a ticket, however, this time we will only be looking at steps 4-5. These steps are important since you might have multiple triggers that use the same webhook so it's essential to configure the trigger accordingly.
When completing step 4, use this opportunity to define WHEN you want the deadline to be added to the ticket which is different to the actual deadline itself. (e.g when the ticket is created)
When you get to step 5, you can use the following JSON body as a guideline for creating a deadline, however, we still need to retrieve the field IDs and input the correct values for the date, time and timezone.
{
"ticket": {
"custom_fields":
[
{"id": <deadline_date_id>, "value":""},
{"id": <deadline_time_id>, "value":""},
{"id": <deadline_timezone_id>, "value":""}
]
}
}
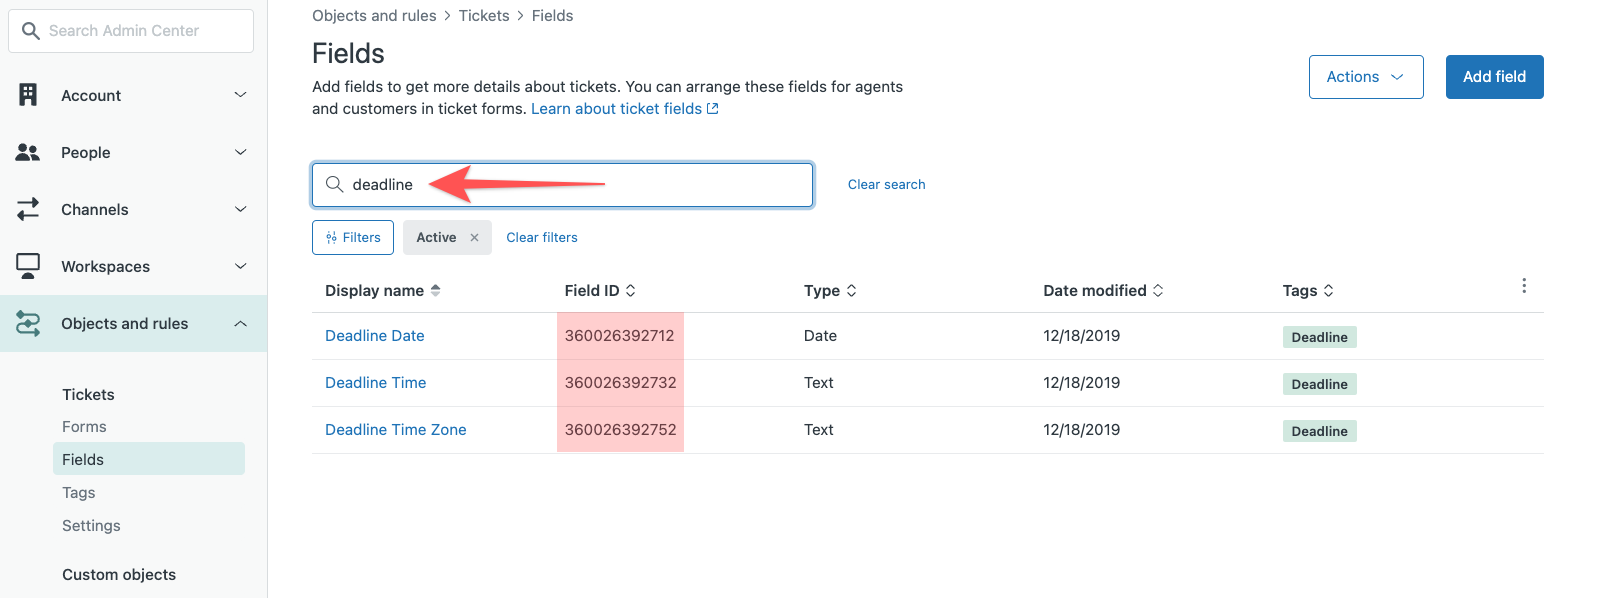
Retrieve the deadline ticket field IDs
1. Open your Admin Center, navigate to Object and rules, then Fields located under Tickets.
2. Search for fields containing the word "deadline" and locate the Deadline Date, Time and Time Zone fields.
3. Copy each of the Field IDs into a notepad so that we can use these within the JSON body.
Using the correct values
Date:
If you're not looking to do anything complex, you can remove this field entirely from the JSON and instead set this within the trigger action. For example, if I want to set a deadline 7 days from now, it would look like the following:

If you want to do something more complex such as setting the value of the deadline date relative to another date field, you would need to set the date within the JSON. This can be useful if you already have a custom date field input as part of your workflow and would like to create a deadline relative to this.
Example:
{"id": <deadline_date_id>, "value":"{{ticket.ticket_field_<date_field_id>}}"}
|
|
For more details on what you can do using liquid markup, please refer to our article here. |
Time:
The time format is stored in 24-hour (HH:MM) so the correct value for 8:30 AM and 3:45 PM would be 08:30 and 15:45 respectively.
Note: A zero must be placed in front of the 8 or it will not be treated as a valid format.
Timezone:
You can refer to the list of tz database timezones to know what the correct value here is.
Example:
UTC
America/New_York
Australia/Melbourne
Final JSON body
The following is the final outcome for a deadline that will be set 7 days from now at 9:00 AM in Melbourne, Australia timezone.
Note: We pasted the field IDs we retrieved earlier and removed the deadline date field from the JSON since this will be set as a separate trigger action.
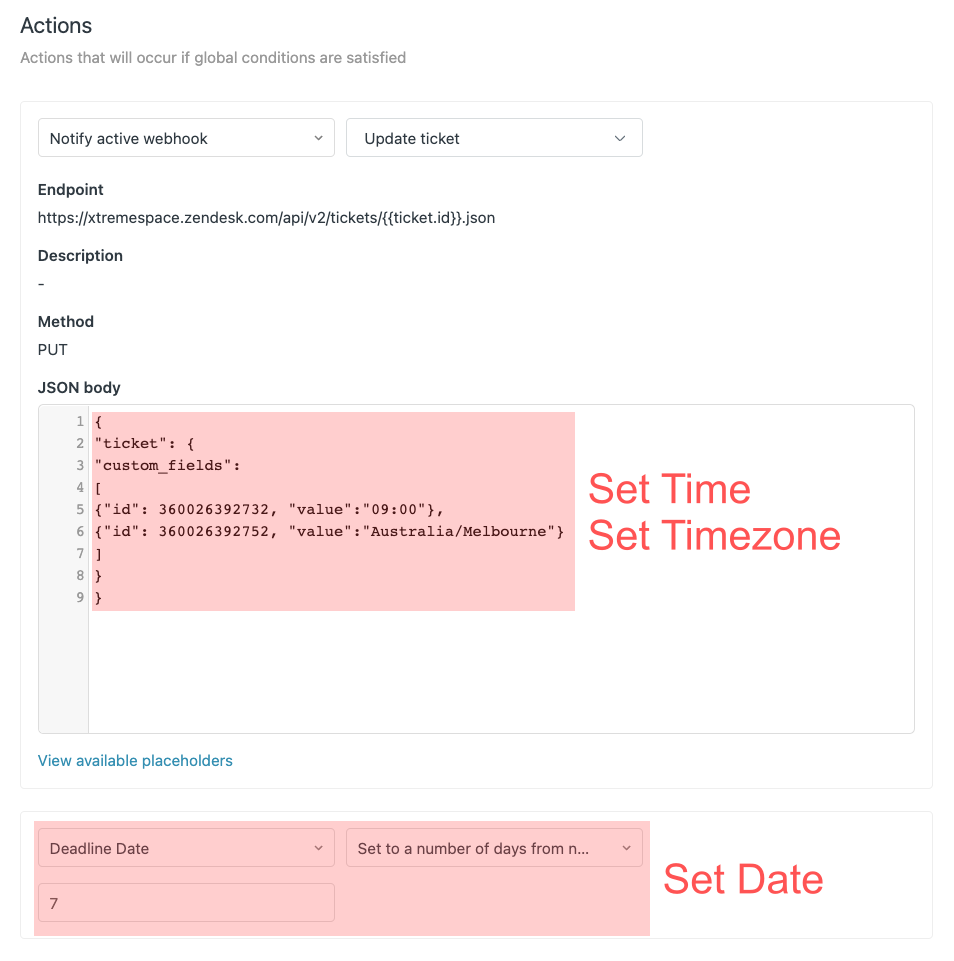
You can now save the trigger and confirm that a deadline is automatically added when the trigger activates.