
The SweetHawk connector allows you to start timers directly from Zendesk Action Builder using the Timers app. This article demonstrates two example workflows to help you get started, however Action Builder workflows can be adapted to suit your own business processes and timer requirements.
The first example uses a single action flow to evaluate a ticket's priority and start the appropriate timers, allowing multiple timers, such as First Reply and Full Resolution, to be started without creating separate Zendesk triggers for each priority.
The second example demonstrates a more advanced single workflow that starts and swaps an active timer as the ticket priority changes. This allows a single Action Builder workflow to handle both the initial timer start and any subsequent timer swaps, reducing the need for multiple Zendesk triggers.
Steps covered in this article:
-
Before you begin
- Example 1. Start timers when a ticket is created
- Example 2. Start and swap timers on ticket creation and priority changes
- FAQ
Before you begin
Before creating these action flows:
- Connect the SweetHawk connector by following Connect SweetHawk to Zendesk Action Builder.
- Create the SweetHawk timer definitions that you want to use, see Getting Started with Timers.
- Create a timer definition for each Zendesk ticket priority (Low, Normal, High and Urgent). For example, a First Response workflow would use First Reply - Low, First Reply - Normal, First Reply - High, and First Reply - Urgent.
- Review Zendesk’s guide, Creating action flows to automate processes across Zendesk and external systems, if you are new to Action Builder.
Example 1: Start timers when a ticket is created
In this example, we'll create an Action Builder workflow that starts one or more timers when a ticket is created. The workflow branches based on the ticket priority, allowing a different timer, or multiple timers, to be started for each priority.
For example, you could start both:
- A First Reply timer
- A Full Resolution timer
With two timer types across four ticket priorities, a single Action Builder workflow can handle up to eight different timer starts, reducing the need for multiple Zendesk triggers.
Add the ticket-created trigger
- Create a new action flow.
- Add a trigger card.
- Under Zendesk, select Tickets.
- Select Lifecycle.
- Select Ticket created.
- Add any additional trigger conditions required for your workflow.
The ticket information returned by this trigger can then be used by the branches and SweetHawk actions later in the flow.
Add a branch for each priority
Click the + beneath the trigger card and select:
Flow control and utilities > Branch
Configure the first branch to check whether the ticket priority is Low:
- Variable: Ticket priority from the trigger card
- Condition: Is
-
Value:
low
Under + Add branch in the same branch card, add another branch for Normal priority and continue adding nested branches for High and Urgent in the same way.
It's recommended to use the final Else path as a fallback for tickets that do not have a priority (-). For example, you could start the Normal priority timers when no priority has been set.
Add the SweetHawk timer actions
Under 'If condition is met' priority branches:
- Click the + beneath the branch.
- Scroll to External actions and select SweetHawk.
- Select Start Timer action.
- Under Zendesk ticket ID, select Ticket ID from the trigger card.
- Under Timer, select the timer definition for the current branch.
To start a second timer on the same ticket, click the + beneath the first timer action and add another SweetHawk Start Timer action.
For example, the priority branches could contain both first reply and full resolution timers as these start at the same time at ticket create.
Note: This action flow only runs when the ticket is created. It will not change or swap the timers if the ticket priority is updated later. Use the next configuration when timers must follow priority changes.
Example 2: Automatically start and swap timers based on ticket priority
In this example, we'll create an Action Builder workflow that both starts and swaps a timer based on the current ticket priority. This allows a single workflow to handle the initial timer start when a ticket is created, and automatically swap the timer if the priority changes later.
For example, in one workflow:
- A ticket is created with Low priority and the Low First Reply timer starts.
- The ticket priority later changes to High.
- The active Low First Reply timer is swapped to the High First Reply timer.
This example uses:
- A Zendesk trigger to add a temporary control tag
- An Action Builder workflow triggered by that tag
- A shared identifier across the priority-based timer actions
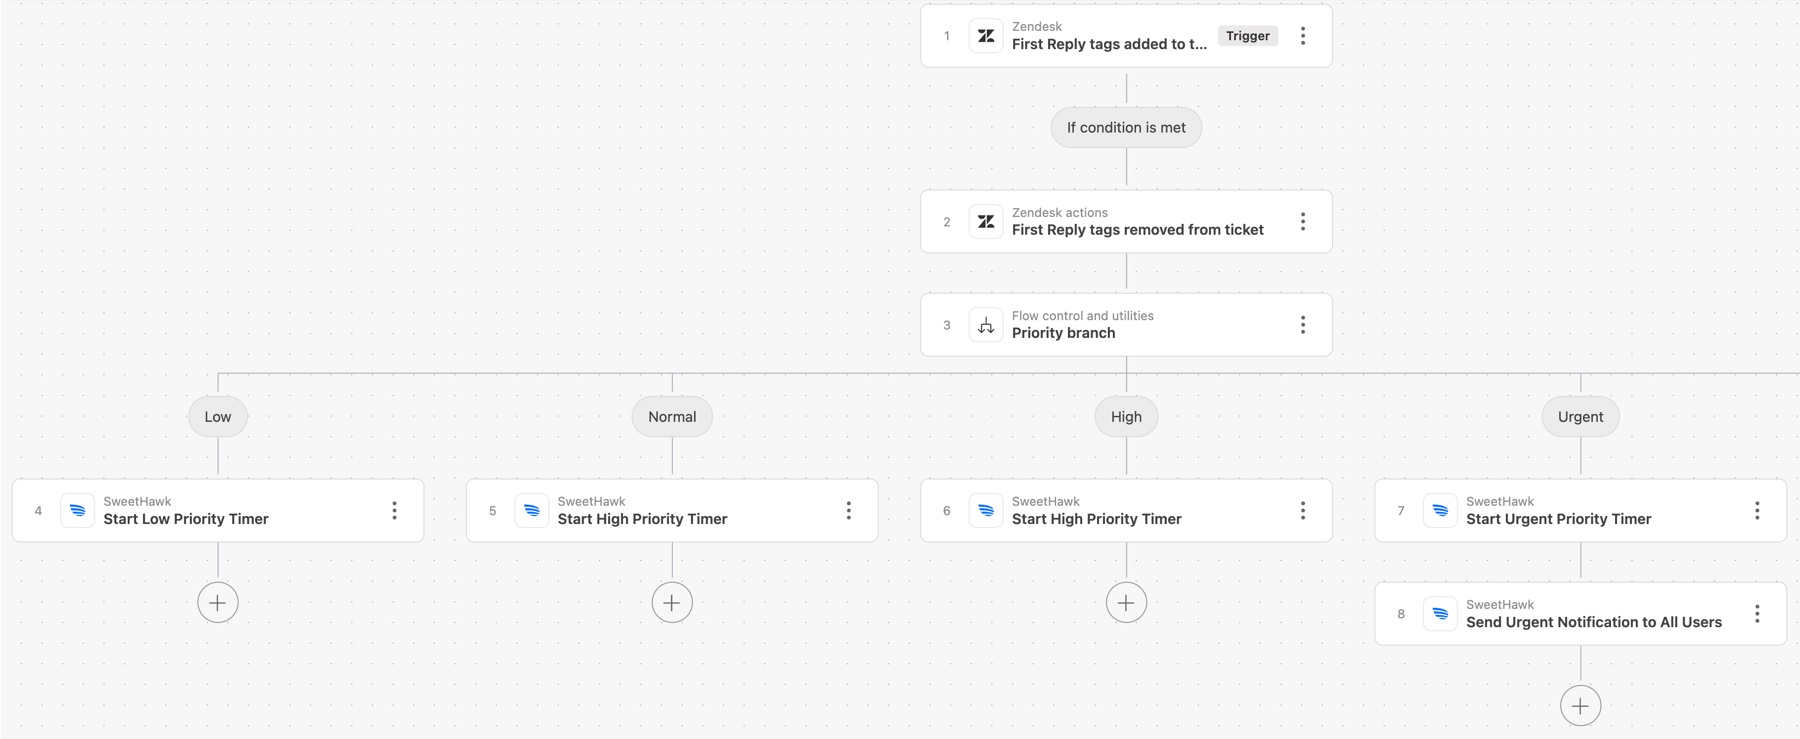
Important: Each start-and-swap Action Builder workflow should manage only one timer series, such as First Reply or Full Resolution. Use separate workflows to prevent stopped timers from being restarted.
Add a stopped tag through a Timer workflow
This step prevents a stopped timer, such as a First Reply timer, from being restarted if the ticket priority changes later. If a timer only stops when the ticket is solved or closed, such as a Full Resolution timer, this step is typically not required.
In the SweetHawk Timers app:
- Open Workflows.
- Create a new workflow or edit an existing workflow.
- Add a Timer stopped ticket update.
- In Zendesk Ticket Updates to add the tag
first_reply_timer_stopped(as example). - Save the workflow.
- Apply the workflow to every First Reply timer definition used by the action flow.
Create a Zendesk trigger to start the Action Builder workflow
To ensure the Action Builder workflow runs when a ticket is created and whenever its priority changes, create a Zendesk trigger that adds a tag to start the Action Builder workflow.
This allows the same Action Builder workflow to handle both the initial timer start and any subsequent timer swaps.
In a new Zendesk trigger set the following:
Meet ALL of the following conditions
- Tags: Contains none of the following
-
Value:
first_reply_timer_stopped(or same tag as step above)
Meet ANY of the following conditions
- Ticket: Is created
- Priority: Changed
Actions
-
Add tags:
first_reply_timer_action
Save the trigger.
Action Flow Creation
Add the tag-change trigger to Action Builder
Create a new action flow that we will use to start and swap our timers.
- Add a trigger card.
- Under Zendesk, select Tickets.
- Select Routing.
- Select Ticket tags changed.
- Click Add condition.
- Configure the condition as follows:
-
Variable:
Tags (added) -
Operator:
Contains at least 1 of -
Value: Enter the tag that should complete the task, such as
first_reply_timer_action. (or the tag you added in your trigger above)
-
Variable:
Remove the workflow tag
The tag that started the Action Builder workflow must now be removed so the Zendesk trigger can add it again when the ticket priority changes in the future.
Click the + beneath the trigger card and add the Zendesk Remove tags from ticket action.
Configure the action as follows:
- Zendesk ticket ID: select Ticket ID from the trigger card.
-
Tags:
first_reply_timer_action
Add a branch for each priority
Click the + beneath the trigger card and select:
Flow control and utilities > Branch
Configure the first branch to check whether the ticket priority is Low:
- Variable: Ticket priority from the trigger card
- Condition: Is
-
Value:
low
Under + Add branch in the same branch card, add another branch for Normal priority and continue adding nested branches for High and Urgent in the same way.
It's recommended to use the final Else path as a fallback for tickets that do not have a priority (-). For example, you could start the Normal priority timers when no priority has been set.
Add the SweetHawk timer actions & identifier
Under 'If condition is met' priority branches:
- Click the + beneath the branch.
- Scroll to External actions and select SweetHawk.
- Select Start Timer action.
- Under Zendesk ticket ID, select Ticket ID from the trigger card.
- Under Timer, select the timer definition for the current branch.
- Under Additional fields, select Identifier.
- Enter the same identifier for every timer in this series. In this example, use
first_reply.
When the Action Builder workflow runs, it will follow the matching priority branch and start the corresponding timer. If an active timer with the same identifier already exists on the ticket, SweetHawk automatically swaps it to the new timer instead of starting a second timer.
The identifier should be unique to each timer series. In this example, first_reply is used for the First Reply timer workflow. If you create another workflow for Full Resolution timers, use a different identifier, such as full_resolution, so each timer series is managed independently.
Save the flow, then test it on a ticket containing the relevant task list or phased task list, before activating the action.
FAQ
Can I also pause, resume or stop timers using Action Builder?
Yes. This guide uses the Start Timer action as an example, but the same approach can be used with the Pause Timer, Resume Timer and Stop Timer actions. The main difference is the trigger that starts your Action Builder workflow, allowing you to automate timers based on your own business processes.
Can I combine Zendesk triggers with Action Builder workflows?
Yes. Zendesk triggers and Action Builder workflows can be used together and are often complementary. You could use action flows to start and triggers to stop for example.
When combining them, ensure the same action isn't performed by both a Zendesk trigger and an Action Builder workflow, as this could result in duplicate actions.
Can I use branching conditions other than ticket priority?
Yes. Ticket priority is used as an example in this guide, but Action Builder workflows can branch on any variables available to the workflow.
Standard ticket fields, such as Status, Type, Tags, and Form ID, are available depending on the trigger you choose. Additional information, such as custom field values, can also be used if it is made available to the workflow, for example by your chosen trigger or by a preceding action that updates or retrieves that data.
This allows you to build workflows based on the information most relevant to your business processes, rather than being limited to ticket priority.